To download LotteryNews for iPhone or iPad click here
Saturday, 23 July 2011
Thursday, 21 July 2011
Friday, 15 July 2011
This post deals with rotating a view with animation with the help of core graphics. Quartz framework provides us with class "CGAffineTransform.h" which contains the function "CGAffineTransform CGAffineTransformRotate ( CGAffineTransform t, CGFloat angle );" that takes the current affine transform matrix and angle in radians as parameters, and returns the resultant affine transform. We will also animate the rotation instead of simply rotating the view by some angle.
Now lets see how it is done.
Suppose we have a view controller class called RotationViewController.
Here needleview is the view we are going to rotate.
In the above code "finalneedle.png" is the image file, in the resources folder, to be used in ImageView. We have implemented "viewDidAppear" to perform rotation with animation after the view appears on screen. The animation block inside the method contains various parameter which has to be set before animating the rotation. The angle of rotation is 60 degree which is converted to radians.
Now lets see how it is done.
Suppose we have a view controller class called RotationViewController.
Write the following code in RotationViewController.h" file
#import <UIKit/UIKit.h>

@interface RotationViewController : UIViewController {
 UIImageView *needleview;
 }

@end
Here needleview is the view we are going to rotate.
Now come to RotationViewController.m file and write the following code
- (void)viewDidLoad {
 needleview=[[UIImageView alloc]
initWithImage:[UIImage imageNamed:@"finalneedle.png"]];
 needleview.frame=CGRectMake(100, 100, 36, 221);
 [self.view addSubview:needleview];
    [super viewDidLoad];
}

-(void)viewDidAppear:(BOOL)animated
{
 [UIView animateWithDuration:2.0

  delay: 0.0

 options: UIViewAnimationOptionCurveEaseIn

 animations:^{

 needleview.transform=CGAffineTransformRotate
(needleview.transform, (((60*22)/7)/180));

  }
  completion:nil];

}
In the above code "finalneedle.png" is the image file, in the resources folder, to be used in ImageView. We have implemented "viewDidAppear" to perform rotation with animation after the view appears on screen. The animation block inside the method contains various parameter which has to be set before animating the rotation. The angle of rotation is 60 degree which is converted to radians.
Monday, 11 July 2011
How to record audio using AVAudioRecorder in iPhone application?
This post deals with recording sound in iPhone application using AVAudioRecorder class. AVAudioRecorder is simple to use and provides facilities for pausing/resuming recording and handling audio interruptions.
Suppose we have a view controller file “RecordViewController”
Implement the following code in RecordViewController.h file.
#import <UIKit/UIKit.h>
#import <AVFoundation/AVFoundation.h>

@interface RecordViewController:UIViewController
<AVAudioRecorderDelegate> {
NSURL *SoundPath;
IBOutlet UIButton *recordOrStopButton;
bool recording;
AVAudioRecorder *soundRecorder;
}
@property(nonatomic,retain) NSURL *SoundPath;
@property(nonatomic,retain) AVAudioRecorder *soundRecorder;
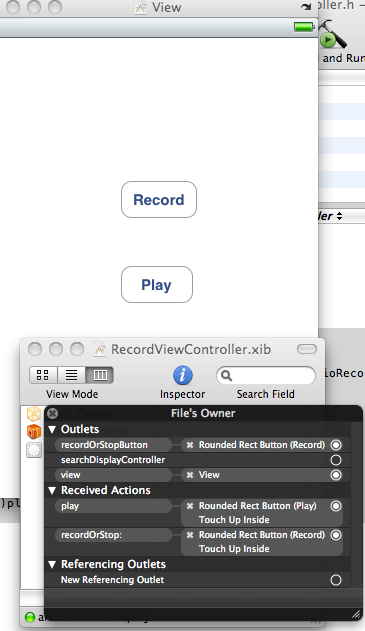
- (IBAction) recordOrStop: (id) sender;
-(IBAction)play;
@endIn the above code
a) We have added AVFoundation framework from the list of existing frameworks and imported AVFoundation.h to RecordViewController.h file.
b) We have also made this class as the delegate for AVAudioRecorder by implementing AVAudioRecorderDelegate.
Now come to RecordViewController.m file and write following code as shown.
@synthesize SoundPath,soundRecorder;
- (void)viewDidLoad {
    [super viewDidLoad];
 NSArray *paths = NSSearchPathForDirectoriesInDomains( NSDocumentDirectory, NSUserDomainMask, YES);
 NSString *documentsDir =[paths objectAtIndex:0];
    NSString *soundFilePath =[documentsDir stringByAppendingPathComponent:@"mysound.caf"];
 NSURL *newURL = [[NSURL alloc] initFileURLWithPath: soundFilePath];
 self.SoundPath=newURL;
 [newURL release];
 recording = NO;
 }
In the above code we are specifying the path for saving the recorded audio. The audio will be saved in Documents folder of this application. Initially we set recoding to NO.
-(IBAction)play
{
 AVAudioPlayer *player =[[AVAudioPlayer alloc] initWithContentsOfURL:SoundPath error: nil];

 [player prepareToPlay];
 [player play];

}
We have implemented this method for playing the recorded audio using AVAudioPlayer.
- (IBAction) recordOrStop: (id) sender {
 if (recording) {
  [soundRecorder stop];
  recording = NO;
  self.soundRecorder = nil;
  [recordOrStopButton setTitle: @"Record" forState:UIControlStateNormal];
  [recordOrStopButton setTitle: @"Record" forState:UIControlStateHighlighted];
  [[AVAudioSession sharedInstance] setActive: NO error: nil];
  [[AVAudioSession sharedInstance] setCategory: AVAudioSessionCategoryPlayback error: nil];
  [[AVAudioSession sharedInstance] setActive: YES error: nil];
  } else {
  [[AVAudioSession sharedInstance] setCategory: AVAudioSessionCategoryRecord error: nil];
  [[AVAudioSession sharedInstance] setActive: YES error: nil];
  NSDictionary *recordSettings =[[NSDictionary alloc] initWithObjectsAndKeys:
   [NSNumber numberWithFloat: 44100.0], AVSampleRateKey,
   [NSNumber numberWithInt: kAudioFormatAppleLossless], AVFormatIDKey,
   [NSNumber numberWithInt: 1], AVNumberOfChannelsKey,
   [NSNumber numberWithInt: AVAudioQualityMax], AVEncoderAudioQualityKey, nil];
  AVAudioRecorder *newRecorder =[[AVAudioRecorder alloc] initWithURL: SoundPath
settings: recordSettings error: nil];
[recordSettings release];
self.soundRecorder = newRecorder;
[newRecorder release];
soundRecorder.delegate = self;
[soundRecorder prepareToRecord];
[soundRecorder record];
[recordOrStopButton setTitle: @"Stop" forState: UIControlStateNormal];
[recordOrStopButton setTitle: @"Stop" forState: UIControlStateHighlighted];
recording = YES;
}
}In the above code we set the category of AVAudioSession to"AVAudioSessionCategoryRecord" and activate it. After that in recordSettings dictionary object we store the values for various settings. The AVAudioRecorder object is then allocated with these settings, after that we start recording.
For playing recorded sound we stop the recording and change the category of AVAudioSession to AVAudioSessionCategoryPlayback and activate it. Recorded audio is listened with the help of AVAudioPlayer object.
-(void)audioRecorderDidFinishRecording:(AVAudioRecorder *)recorder successfully:(BOOL)flag
{
 NSLog(@"success");
}
-(void)audioRecorderEncodeErrorDidOccur:(AVAudioRecorder *)recorder error:(NSError *)error
{
 NSLog(@"fail");
}
We can also implement the above delegate methods which are called when audio is recorded successfully or when it fails.
Save, Build and run you project
NOTE- For recording of sound we need actual device i.e iPhone, it will not work on Simulator.
Wednesday, 6 July 2011
How to make a custom view in iPhone application?
This post deals with making custom views in iPhone application. You can design your views according to your ideas rather than using plain UIView. You can draw variety of patterns in your custom views using Quartz framework and then use these views in your application.
In this snippet we will add a simple coloured rectangle in a view.
1) Add a new file in your project and select it as a subclass of UIView as shown in figure.

2) Lets name it as “new”, so now you must have got two files “new.h” and “new.m” . new.h inherits UIView.
3) Lets say we have a view controller. Open its xib file, select view in file owner window and change its class from UIView to new in library inspector window as shown in figure.

4) Now come to new.m file, uncomment and ovewrite its “drawRect:” method with code shown below
5) Save, build and run the project.
6) Output is as shown below. Now you can use this view in any view controller in your application.

In this snippet we will add a simple coloured rectangle in a view.
1) Add a new file in your project and select it as a subclass of UIView as shown in figure.

2) Lets name it as “new”, so now you must have got two files “new.h” and “new.m” . new.h inherits UIView.
3) Lets say we have a view controller. Open its xib file, select view in file owner window and change its class from UIView to new in library inspector window as shown in figure.

4) Now come to new.m file, uncomment and ovewrite its “drawRect:” method with code shown below
- (void)drawRect:(CGRect)rect {
    // Drawing code.
 CGContextRef context = UIGraphicsGetCurrentContext();
 CGContextSetRGBStrokeColor(context, 1.0f, 0.3f, 0.5f, 1.0f);
 CGContextStrokeRectWithWidth(context,CGRectMake(20, 20, 280, 420), 10);
}
5) Save, build and run the project.
6) Output is as shown below. Now you can use this view in any view controller in your application.

Sunday, 3 July 2011
How to play sound in iPhone application?
This post deals with playing sound in iPhone applications. You can play sounds in your application using an instance of AVAudioPlayer class. AVAudioPlayer lets you play audio in different formats available in iOS. You can play, pause or stop an audio player using its properties.
1) Add the framework AVFoundation.framework from existing framework.
2) Lets say we have a view controller class “PlayViewController” . In .h file write the following code as shown below.
3) In the above code we have imported “AVAudioPlayer.h” which is inside AVFoundation framework. We have also implemented AVAudioPlayerDelegate protocol in this class.
4) Now come to .m file and write the following code in “viewDidLoad” method.
Here snd1 is the name of the mp3 file present in the resources folder of the Xcode project.
5) Implement the play method as shown below.
Here property playing of player tells whether the player is currently playing or not, based on which we set the title for button.
6) Implement the following delegate method, as shown, in .m file
This delegate method is called when the player is finished playing. We can change title of the button inside the implementaion of the above method.
7) Now open .xib file, add a UIButton and make connections as shown below.
 8) Save, build and run your application.
1) Add the framework AVFoundation.framework from existing framework.
2) Lets say we have a view controller class “PlayViewController” . In .h file write the following code as shown below.
#import <UIKit/UIKit.h>

#import <AVFoundation/AVAudioPlayer.h>

@interface PlayViewController : UIViewController<avaudioplayerdelegate> {

AVAudioPlayer *player;

IBOutlet UIButton *button;

}


-(IBAction)play;

@end
3) In the above code we have imported “AVAudioPlayer.h” which is inside AVFoundation framework. We have also implemented AVAudioPlayerDelegate protocol in this class.
4) Now come to .m file and write the following code in “viewDidLoad” method.
NSString *soundFilePath = [[NSBundle mainBundle] pathForResource: @"snd1" ofType: @"mp3"];

NSURL *fileurl = [[NSURL alloc] initFileURLWithPath: soundFilePath];

player =[[AVAudioPlayer alloc] initWithContentsOfURL: fileurl error: nil];

[fileurl release];

[player prepareToPlay];

[player setDelegate: self];
Here snd1 is the name of the mp3 file present in the resources folder of the Xcode project.
5) Implement the play method as shown below.
-(IBAction)play

{

if (player.playing) {

[button setTitle: @"Play" forState: UIControlStateHighlighted];

[button setTitle: @"Play" forState: UIControlStateNormal];

[player pause];

}

else {

[button setTitle: @"Pause" forState: UIControlStateHighlighted];

[button setTitle: @"Pause" forState: UIControlStateNormal];

[player play];

}

}
Here property playing of player tells whether the player is currently playing or not, based on which we set the title for button.
6) Implement the following delegate method, as shown, in .m file
- (void) audioPlayerDidFinishPlaying: (AVAudioPlayer *) player successfully: (BOOL) completed {

if (completed == YES) {

[button setTitle: @"Play" forState: UIControlStateNormal];

}

}
This delegate method is called when the player is finished playing. We can change title of the button inside the implementaion of the above method.
7) Now open .xib file, add a UIButton and make connections as shown below.

Subscribe to:
Comments (Atom)