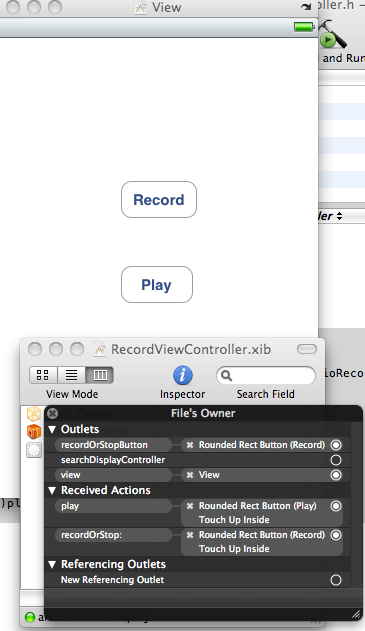
This post deals with recording sound in iPhone application using AVAudioRecorder class. AVAudioRecorder is simple to use and provides facilities for pausing/resuming recording and handling audio interruptions.
Suppose we have a view controller file “RecordViewController”
Implement the following code in RecordViewController.h file.
#import <UIKit/UIKit.h>
#import <AVFoundation/AVFoundation.h>

@interface RecordViewController:UIViewController
<AVAudioRecorderDelegate> {
 NSURL *SoundPath;
 IBOutlet UIButton *recordOrStopButton;
 bool recording;
 AVAudioRecorder *soundRecorder;

}
@property(nonatomic,retain) NSURL *SoundPath;
@property(nonatomic,retain) AVAudioRecorder *soundRecorder;
- (IBAction) recordOrStop: (id) sender;
-(IBAction)play;
@end
In the above code
a) We have added AVFoundation framework from the list of existing frameworks and imported AVFoundation.h to RecordViewController.h file.
b) We have also made this class as the delegate for AVAudioRecorder by implementing AVAudioRecorderDelegate.
Now come to RecordViewController.m file and write following code as shown.
@synthesize SoundPath,soundRecorder;
- (void)viewDidLoad {
    [super viewDidLoad];
 NSArray *paths = NSSearchPathForDirectoriesInDomains( NSDocumentDirectory, NSUserDomainMask, YES);
 NSString *documentsDir =[paths objectAtIndex:0];
    NSString *soundFilePath =[documentsDir stringByAppendingPathComponent:@"mysound.caf"];
 NSURL *newURL = [[NSURL alloc] initFileURLWithPath: soundFilePath];
 self.SoundPath=newURL;
 [newURL release];
 recording = NO;
 }
In the above code we are specifying the path for saving the recorded audio. The audio will be saved in Documents folder of this application. Initially we set recoding to NO.
-(IBAction)play
{
 AVAudioPlayer *player =[[AVAudioPlayer alloc] initWithContentsOfURL:SoundPath error: nil];

 [player prepareToPlay];
 [player play];

}
We have implemented this method for playing the recorded audio using AVAudioPlayer.
- (IBAction) recordOrStop: (id) sender {
 if (recording) {
  [soundRecorder stop];
  recording = NO;
  self.soundRecorder = nil;
  [recordOrStopButton setTitle: @"Record" forState:UIControlStateNormal];
  [recordOrStopButton setTitle: @"Record" forState:UIControlStateHighlighted];
  [[AVAudioSession sharedInstance] setActive: NO error: nil];
  [[AVAudioSession sharedInstance] setCategory: AVAudioSessionCategoryPlayback error: nil];
  [[AVAudioSession sharedInstance] setActive: YES error: nil];
  } else {
  [[AVAudioSession sharedInstance] setCategory: AVAudioSessionCategoryRecord error: nil];
  [[AVAudioSession sharedInstance] setActive: YES error: nil];
  NSDictionary *recordSettings =[[NSDictionary alloc] initWithObjectsAndKeys:
   [NSNumber numberWithFloat: 44100.0], AVSampleRateKey,
   [NSNumber numberWithInt: kAudioFormatAppleLossless], AVFormatIDKey,
   [NSNumber numberWithInt: 1], AVNumberOfChannelsKey,
   [NSNumber numberWithInt: AVAudioQualityMax], AVEncoderAudioQualityKey, nil];
  AVAudioRecorder *newRecorder =[[AVAudioRecorder alloc] initWithURL: SoundPath
settings: recordSettings error: nil];
[recordSettings release];
self.soundRecorder = newRecorder;
[newRecorder release];
soundRecorder.delegate = self;
[soundRecorder prepareToRecord];
[soundRecorder record];
[recordOrStopButton setTitle: @"Stop" forState: UIControlStateNormal];
[recordOrStopButton setTitle: @"Stop" forState: UIControlStateHighlighted];
recording = YES;
}
}In the above code we set the category of AVAudioSession to"AVAudioSessionCategoryRecord" and activate it. After that in recordSettings dictionary object we store the values for various settings. The AVAudioRecorder object is then allocated with these settings, after that we start recording.
For playing recorded sound we stop the recording and change the category of AVAudioSession to AVAudioSessionCategoryPlayback and activate it. Recorded audio is listened with the help of AVAudioPlayer object.
-(void)audioRecorderDidFinishRecording:(AVAudioRecorder *)recorder successfully:(BOOL)flag
{
 NSLog(@"success");
}
-(void)audioRecorderEncodeErrorDidOccur:(AVAudioRecorder *)recorder error:(NSError *)error
{
 NSLog(@"fail");
}
We can also implement the above delegate methods which are called when audio is recorded successfully or when it fails.
Save, Build and run you project
NOTE- For recording of sound we need actual device i.e iPhone, it will not work on Simulator.

No comments:
Post a Comment